PHP运行shell脚本 2021-07-07 16:39:00 - 2025-08-18 00:12:03 無慕 - 1.15K - 25秒 - 2.18K /** * 执行shell脚本 * @param $shell shell脚本命令 * @param false $is_print 是否打印过程 */ function startshell($shell, $is_print = false) { if ($is_print) { //shell=》shell命令,status=》执行结果的状态,0为成功 echo "<pre>"; system($shell, $status); echo "</pre>"; } else { //shell=》shell命令,result=》执行结果的过程,status=》执行结果的状态,0为成功 exec($shell, $result, $status); } if ($status) { return false; } else { return true; } } 编程 - 后端 PHP方法 PHP
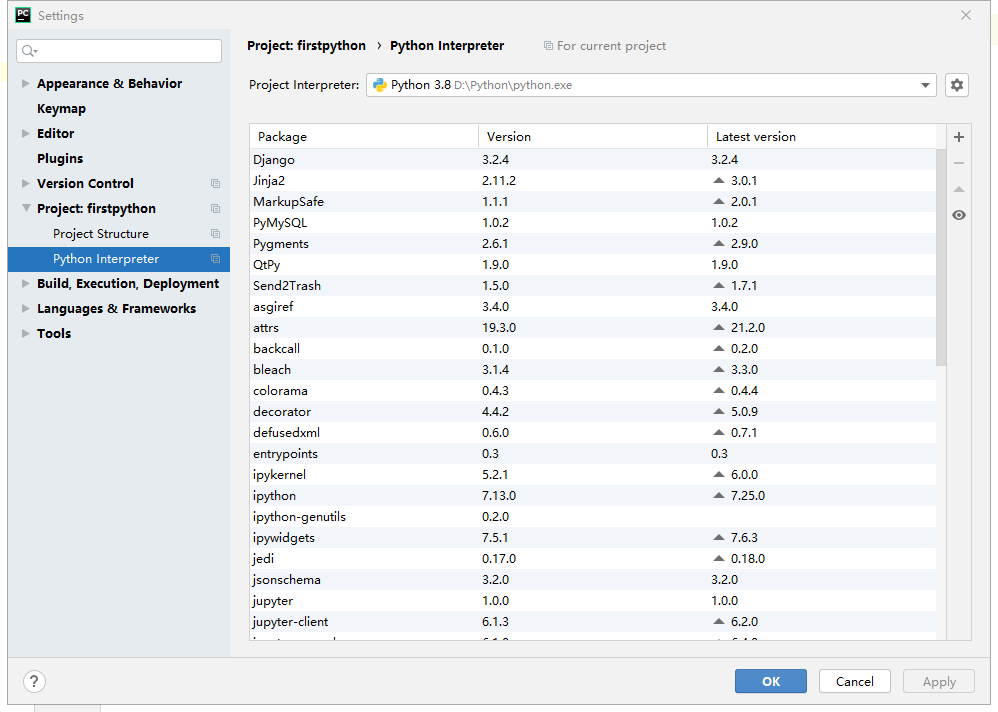
解决PyCharm代码不提示的问题 2021-07-01 11:31:46 - 2025-08-18 00:12:03 無慕 - 255 - 6秒 - 2.29K 前言:本机环境windows10,python版本3.8版本。解决方法①:点击FIle->选择settings->点击Project 【项目名】->点击Python Interpreter,使用右侧添加一下自己Python的安装路径,添加成功后下面的列表会展示你已经安装的Python插件,点击OK,结束!解决方法②:这个如果不是故意去掉的话,可能问题还是出在①中了。点击FIle->选择settings查看,如果“Power Save Mode”勾选上了,代表关闭了代码提示,点击将勾选取消,则代码提示就自动开启了。 编程 - 编程软件 PyCharm 教程
Django的安装 2021-07-01 09:58:12 - 2025-08-18 00:12:03 無慕 - 556 - 12秒 - 2.28K 前言:本机环境是windows10,python环境目前我安装的是最新的3.8.2版本。安装步骤在安装python完成后,使用命令行安装Django框架,不写==版本号默认安装最新版pip install Django==版本号卸载命令pip uninstall DjangoDjango安装完成后,在命令行窗口依次输入下面三行命令查看是否安装成功。python #启动python import django #引入Django django.get_version() #获取版本号创建Django项目安装好Django后,在命令行输入以下命令创建项目,创建位置随意,但是不建议路径中带有中文。注:newproject是新建的项目目录名称django-admin startproject newproject运行后什么都没有反馈则说明创建成功。运行Django项目命令行进入创建好的Django项目目录中,执行下面命令进行编译运行。0.0.0.0是指任何服务器都能链接到此,端口默认是8000。python manage.py runserver 0.0.0.0:8000 编程 - 后端 Django Python
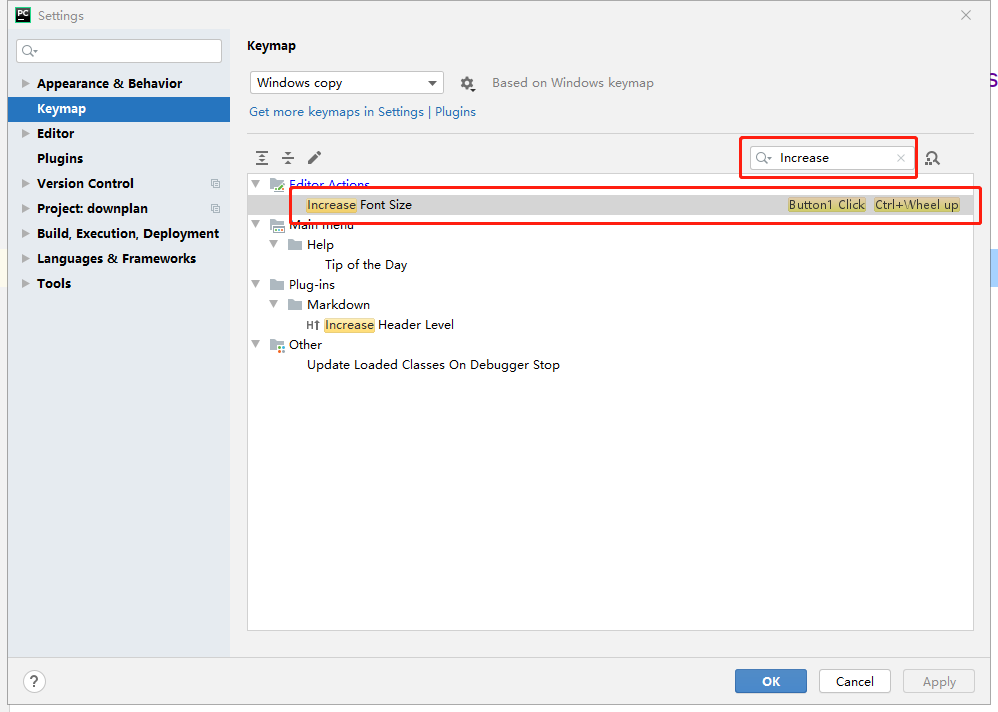
解决PyCharm点击放大的问题 2021-06-30 14:56:07 - 2025-08-18 00:12:03 無慕 - 235 - 5秒 - 2.41K 前言:我现在是一名python的初学者,因为有其他语言的基础,所以上来就用了全家桶中的PyCharm这款软件,我不知道是不是所有人都有这个问题,我的软件点击编辑窗口中的内容就会放大,在网上也找了一些教程来解决了一下这个问题。修改方法:点击FIle->选择settings->点击Keymap,使用右侧搜索栏搜索单词:Increase,会出来下面一个界面,在Increase Font Size上右键点击remove button 1 click(删除按钮1单击),点击OK,结束! 编程 - 编程软件 PyCharm 教程
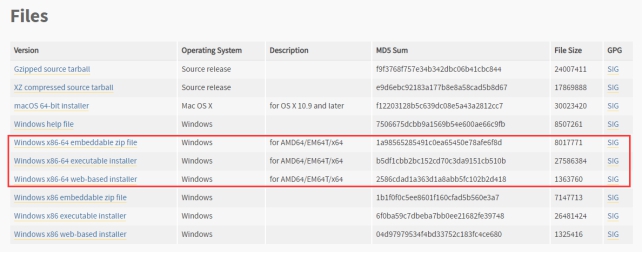
Python的安装 2021-06-22 13:51:18 - 2025-08-18 00:12:03 無慕 - 519 - 5秒 - 2.25K 先介绍下本机环境:windows10的系统。直接上干货!安装步骤:官方下载地址:https://www.python.org/,带着-64的是64位的windows系统,不带的则是32位。zip file表示.zip格式的绿色免安装版本,可以直接嵌入(集成)到其它的应用程序中(不建议原因:不会将 Python 命令工具所在目录添加到系统 Path 环境变量中,以后开发程序或者运行 Python 命令会不方便)。executable installer:表示.exe格式的可执行程序,这是完整的离线安装包,一般选择这个即可。web-based installer:表示通过网络安装的,也就是说下载到的是一个空壳,安装过程中还需要联网下载真正的 Python 安装包。打开安装程序①自定义安装②尽量勾选Add Python 3.8 to PATH,这样可以将 Python 命令工具所在目录添加到系统 Path 环境变量中,以后开发程序或者运行 Python 命令会非常方便。选择c盘以外的盘符,减少c盘压力,建议路径不要出现中文等待安装完成后关闭打开cmd,输入:python(小写),出现以下情况就说明安装成功了。输出任意代码试一下相关程序在开始菜单中,桌面不会有图标。end 编程 - 后端 Python
PHP使用Elasticsearch查询之query的用法(bool过滤查询) 2021-06-18 14:05:38 - 2025-08-18 00:12:03 無慕 - 7.02K - 3.97分钟 - 2.34K 下面文章中的方法和其它未说明的内容请前往此文档进行查看:Elasticsearch在PHP中的使用在PHP中使用ELasticsearch查询时,怎样对内容进行检索,怎样将不同的条件像if一样进行and或or的组合查询,这篇文章就来说说这些事。先来看几个查询搜索的例子:单词或多词查询,多个词之间用空格间隔,默认or组合检索,即只要有一个符合就会被检索出来。//单(多)词查询 $search_where = [ 'match' => [ 'title' => [ 'query' => '删库 别烦我',//检索内容,多个词使用空格隔开 ] ] ]; //或者:精简写法(当无其他参数时,推荐词用法) $search_where = [ 'match' => [ 'title' =>'删库 别烦我',//检索内容,多个词使用空格隔开 ] ]; $data = $ES->search_doc($search_where, [], 0, 10);多词查询,为了提高查询精度想要多个条件同时满足,需要用and进行组合检索,因为使用operator操作符,所以不能在使用精简写法。//单(多)词查询,提高精度 $search_where = [ 'match' => [ 'title' => [ 'query' => '删库 别烦我',//检索内容,多个词使用空格隔开 "operator": "and" ] ] ]; $data = $ES->search_doc($search_where, [], 0, 10);多词查询,为了控制精度,需要引入minimum_should_match操作符。minimum_should_match 操作符指的是最小匹配参数,这让我们可以指定必须匹配的词项数用来表示一个文档是否相关。我们可以将其设置为某个具体数字,更常用的做法是将其设置为一个百分数,因为我们无法控制用户搜索时输入的单词数量。$search_where = [ 'match' => [ 'title' => [ 'query' => '区别 推荐 排序', "minimum_should_match"=>"70%" //在此三个词的示例中, 75% 会自动被截断成 66.6% ,即至少匹配三个里面的两个词。 ] ] ]; $data = $ES->search_doc($search_where, [], 0, 10);然后来一个复杂的组合查询:bool过滤查询。此例子查询返回title字段中带有php词项,但不带有Elasticsearch词项的结果,且结果如果还满足mysql词项或者tp词项,那么_score的值将会更高。bool 查询会为每个文档计算相关度评分 _score ,再将所有匹配的 must 和 should 语句的分数 _score 求和,最后除以 must 和 should 语句的总数。must_not 语句不会影响评分;它的作用只是将不相关的文档排除。$search_where = [ 'bool' => [ 'must' => [ 'match' => [ 'title' => [ 'query' => 'php', ] ] ], 'must_not' => [ 'match' => [ 'title' => [ 'query' => 'Elasticsearch', ] ] ], 'should' => [ 'match' => [ 'title' => [ 'query' => 'mysql tp', ] ] ] ] ]; $data = $ES->search_doc($search_where, [], 0, 10);然后先总结一下bool过滤查询的几种类型:Bool查询现在包括四种子句:must、filter、should、must_not①must:返回的文档必须满足must子句的条件,并且参与计算分值。②filter:返回的文档必须满足filter子句的条件,但不会像must一样,参与计算分值。③should:返回的文档可能满足should子句的条件。在一个bool查询中,如果没有must或者filter,有一个或者多个should子句,那么只要满足一个就可以返回。minimum_should_match参数定义了至少满足几个子句。④must_not:返回的文档必须不满足must_not的定义的条件。boost操作符的使用$search_where = [ 'bool' => [ 'should' => [ 'match' => [ 'title' => [ 'query' => 'php', ] ], 'match' => [ 'description' => [ 'query' => 'php', 'boost'=>9//权重更大 ] ] ] ] ]; $data = $ES->search_doc($search_where, [], 0, 10);有关boost使用的补充:当未定义boost时默认为1,。boost参数是用来提升一个语句的相对权重,当大于1时是提高权重,当处于0-1时是讲定权重,但这种提升或者降低并不是线性的,换句话说,如果一个boost的值为2,并不能获得两倍的_score。简单来说,更高的boost值为我们带来更高的_score。 编程 - 后端 Elasticsearch PHP
PHP使用Elasticsearch查询之sort的用法 2021-06-18 13:53:11 - 2025-08-18 00:12:03 無慕 - 800 - 3.22分钟 - 2.42K 下面文章中的方法和其它未说明的内容请前往此文档进行查看:Elasticsearch在PHP中的使用在PHP中使用ELasticsearch查询时,怎样对查询结果进行排序,我分为了三种情况:情况一:当查询中sort条件为空时,Elasticsearch会自动根据检索条件匹配相似度,生成一个相似度的数值_score,而查询结果会按这个_score进行倒序排列。$data = $ES->search_doc($search_where, '', 0, 10);情况二:当只传字段名时,Elasticsearch会按检索结果中此字段的值进行正序排列。$data = $ES->search_doc($search_where, 'age', 0, 10);情况三:组合排序,一个或多个字段进行指定排序时,类似于数据库中order的作用。用法(排序规则,desc倒序排列,asc正序排列):['字段名'=>['order'=>'排序规则'],'字段名2'=>['order'=>'排序规则']]注意:当未指定_score字段时,Elasticsearch不会计算检索条件的匹配相似程度,查询结果中的_score的值为null。$data = $ES->search_doc($search_where, ['age'=>['order'=>'desc'],'_score'=>['order'=>'desc'],], 0, 10); 编程 - 后端 Elasticsearch PHP
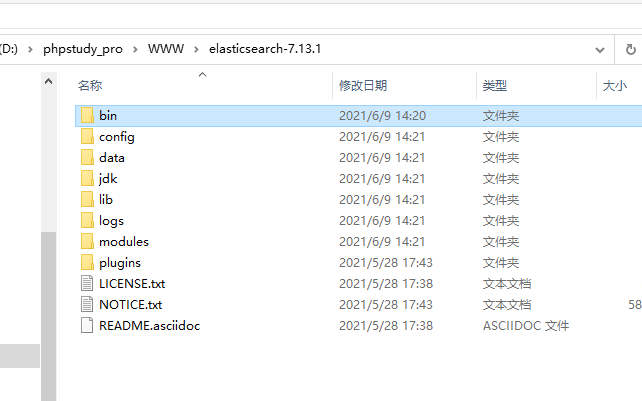
Elasticsearch在PHP中的使用 2021-06-17 10:35:58 - 2025-08-18 00:12:03 無慕 - 2.20W - 12.88分钟 - 2.52K 什么是elasticsearch?Elasticsearch是一个基于java语言开发的分布式多用户的全文搜索引擎,在云计算中,能够达到实时搜索,稳定、可靠、快速,安装方便。官方客户端在java、PHP、Python、.NET等其他语言都是可用的。Elasticsearch 是一个分布式、高扩展、高实时的搜索与数据分析引擎。安装Elasticsearch首先安装java环境,因为Elasticsearch是基于java运行的。参考:java的安装。下载Elasticsearch,建议最新版,其他版本我下载后出现问题,解决非常麻烦。GitHub下载地址:https://github.com/elastic/elasticsearch官方发行版下载地址:https://www.elastic.co/cn/downloads/elasticsearch下载成功后打开根目录样式如下:命令行启动Elasticsearch服务:elasticsearch.bat浏览器访问以下地址,如果如图显示则安装成功!http://localhost:9200/end安装Elasticsearch管理工具:Elasticsearch-Head此工具是为了对Elasticsearch中的数据进行可视化管理,类似于Navicat。安装使用参考查看:Elasticsearch-Head的安装。安装中文分词器:Elasticsearch-analysis-ikElasticsearch-analysis-ik中文分词器是为了将中文搜索条件进行分词搜索使用的。安装使用参考查看:Elasticsearch-analysis-ik的安装。在PHP中安装Elasticsearch1、首先下载composer2、cmd进入项目根目录下3、使用composer命令进行安装:composer require elasticsearch/elasticsearch4、end在TP中使用Elasticsearchuse Elasticsearch\ClientBuilder; class Es extends BaseController { protected $client; public $index_name;//索引值,类似于数据库名 /** * Es constructor. * @param string $index_name 索引名称 */ public function __construct($index_name = "shx") { parent::__construct(); //给定默认值 $this->index_name = $index_name; //自动连接Elasticsearch服务器 $this->client = ClientBuilder::create()->setHosts(['127.0.0.1:9200'])->build(); } /** * ELasticsearch初次使用 */ public function index() { //删除原索引 //$this->delete_index(); //创建新索引 //$this->create_index(); //自定义内容,也可换成数据库内容 $docs = []; $docs[] = ['id' => 1, 'name' => '叶凡', 'content' => '我做的ui界面强无敌。', 'age' => 23]; $docs[] = ['id' => 2, 'name' => '秦昊', 'content' => '我的php代码无懈可击。', 'age' => 24]; $docs[] = ['id' => 3, 'name' => '萧炎', 'content' => 'C的生活,快乐每一天。', 'age' => 29]; $docs[] = ['id' => 4, 'name' => '林动', 'content' => '就没有我做不出的前端页面。', 'age' => 26]; $docs[] = ['id' => 5, 'name' => '唐三', 'content' => 'php是最好的语言。', 'age' => 21]; $docs[] = ['id' => 6, 'name' => '秦宇', 'content' => '别烦我,我正在敲bug呢!', 'age' => 25]; $docs[] = ['id' => 7, 'name' => '宋书航', 'content' => '为所欲为,不行就删库跑路', 'age' => 27]; foreach ($docs as $k => $v) { //添加文档 $this->add_doc($v['id'], $v); } //查看映射(整个index索引的相关信息,不包括数据) //$res = $this->get_mapping(); //搜索结果 $search_where = [ 'bool' => [ 'should' => [ [ 'match' => [ 'content' => [ 'query' => '删库 别烦我',//查询内容 'boost' => 3, // 权重大 ] ] ], [ 'match' => [ 'name' => [ 'query' => '删库 别烦我', 'boost' => 2, ] ] ], ], ], ]; //按照搜索条件,age倒序排列,每页10条数据,查看第一页的数据 //$data = $this->search_doc($search_where, ['age' => ['order' => 'desc']], 0, 10); //按照搜索条件,按照匹配度由高到低排序,每页2条数据,查看第一页的数据 $data = $this->search_doc($search_where, [], 0, 2); dump($data); } /** * 创建索引 * @return array|mixed */ public function create_index() { //给定索引名 $index_name = $this->index_name; // 只能创建一次 $params = [ 'index' => $index_name, 'body' => [ //定义映射中的一些设置 'settings' => [ 'number_of_shards' => 5,//数据分片数,默认为5,有的时候也会用3 'number_of_replicas' => 0//数据备份数,如果只有一台机器,则设置为0 ] ] ]; try { //完成创建索引的映射 return $this->client->indices()->create($params); } catch (Elasticsearch\Common\Exceptions\BadRequest400Exception $e) { $msg = $e->getMessage(); $msg = json_decode($msg, true); return $msg; } } /** * 删除索引 * @return array */ public function delete_index() { //给定索引名 $index_name = $this->index_name; $params = ['index' => $index_name]; //删除指定索引,包括其中的数据映射等 $response = $this->client->indices()->delete($params); return $response; } /** * 查看映射 * @return array */ public function get_mapping() { //给定索引名 $index_name = $this->index_name; $params = [ 'index' => $index_name, ]; //查看指定索引下指定 $response = $this->client->indices()->getMapping($params); return $response; } /** * 添加文档,一次仅插入一条 * @param $id 此条数据索引id * @param $doc 此条数据具体内容,例:['name'=>'shx'] * @return array|callable */ public function add_doc($id, $doc) { //给定索引名 $index_name = $this->index_name; $params = [ 'index' => $index_name, 'id' => $id, 'body' => $doc ]; //添加一条文档 $response = $this->client->index($params); return $response; } /** * 判断文档存在 * @param $id 索引id * @return bool */ public function exists_doc($id) { //给定索引名 $index_name = $this->index_name; $params = [ 'index' => $index_name, 'id' => $id ]; //判断文档是否存在 $response = $this->client->exists($params); return $response; } /** * 获取文档 * @param $id 索引id * @return array|callable */ public function get_doc($id) { //给定索引名 $index_name = $this->index_name; $params = [ 'index' => $index_name, 'id' => $id ]; //获取指定id的文档内容 $response = $this->client->get($params); return $response; } /** * 更新文档,一次仅更新一次 * @param $id 需要更新的索引id * @param $update_data 更新内容,例:['name'=>'shxtest'] * @return array|callable */ public function update_doc($id, $update_data) { //给定索引名 $index_name = $this->index_name; // 可以灵活添加新字段,最好不要乱添加 $params = [ 'index' => $index_name, 'id' => $id, 'body' => [ 'doc' => $update_data ] ]; $response = $this->client->update($params); return $response; } /** * 删除文档 * @param $id 索引id * @return array|callable */ public function delete_doc($id) { //给定索引名 $index_name = $this->index_name; $params = [ 'index' => $index_name, 'id' => $id ]; $response = $this->client->delete($params); return $response; } /** * 查询文档 * @param $search_where 检索条件 * @param array $order 排序,此处如果传空数组,则会按相似度由高到低进行排序。例如:['age' => ['order' => 'desc']] * @param int $from 分页的页数,从0开始为第一页 * @param int $size 分页条数(每页显示多少条) * @return array|callable */ public function search_doc($search_where, $order, $from = 0, $size = 2) { //给定索引名 $index_name = $this->index_name; $params = [ 'index' => $index_name, 'body' => [ //检索条件 'query' => $search_where, //排序内容 'sort' => $order, //页数 'from' => $from, //每页条数 'size' => $size ] ]; $results = $this->client->search($params); return $results; } }重要概念MySQL中的数据库就相当于Elasticsearch的index索引。MySQL中的数据表就相当于Elasticsearch的type。MySQL中的每行数据就相当于Elasticsearch的doument。MySQL中的表字段就相当于Elasticsearch的Field。MySQL中的视图就相当于Elasticsearch的Mapping。注意:MySQL和Elasticsearch无任何直接关系,只是在此举例说明。 注意事项elasticsearch运行是基于java的,所以如果想要使用elasticsearch首先需要安装java环境。如果安装最新版ES插件,请检查PHP版本,例如当前安装elasticsearch7.11,则PHP版本必须大于等于7.1。相关文章PHP使用Elasticsearch查询之sort的用法PHP使用Elasticsearch查询之query的用法(bool过滤查询) 编程 - 后端 Elasticsearch ThinkPHP PHP
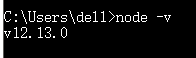
Elasticsearch-Head的安装 2021-06-17 10:24:47 - 2025-08-18 00:12:03 無慕 - 694 - 21秒 - 2.53K 首先说明下我安装时的环境是windows10。安装步骤安装node.js,下载与自己系统符合的版本进行安装:官网下载地址:https://nodejs.org/en/download/安装完成后可在命令行中输入:node -v查看版本下载Elasticsearch-Head下载地址:https://github.com/mobz/elasticsearch-head下载解压后的目录:cmd命令行进入此目录,执行npm install,成功后执行npm run start:服务开启成功后,在浏览器访问localhost:9100,一开始集群健康值可能会显示:未连接如果显示未连接,则找到Elasticsearch安装目录(注意,不是Elasticsearch-head安装目录),打开config/elasticsearch.yml,在最下方增加以下代码:http.cors.enabled: true http.cors.allow-origin: "*" http.cors.allow-methods: OPTIONS, HEAD, GET, POST, PUT, DELETE http.cors.allow-headers: "X-Requested-With, Content-Type, Content-Length, X-User"保存后重启Elasticsearch和Elasticsearch-head。end 编程 - 后端 Elasticsearch
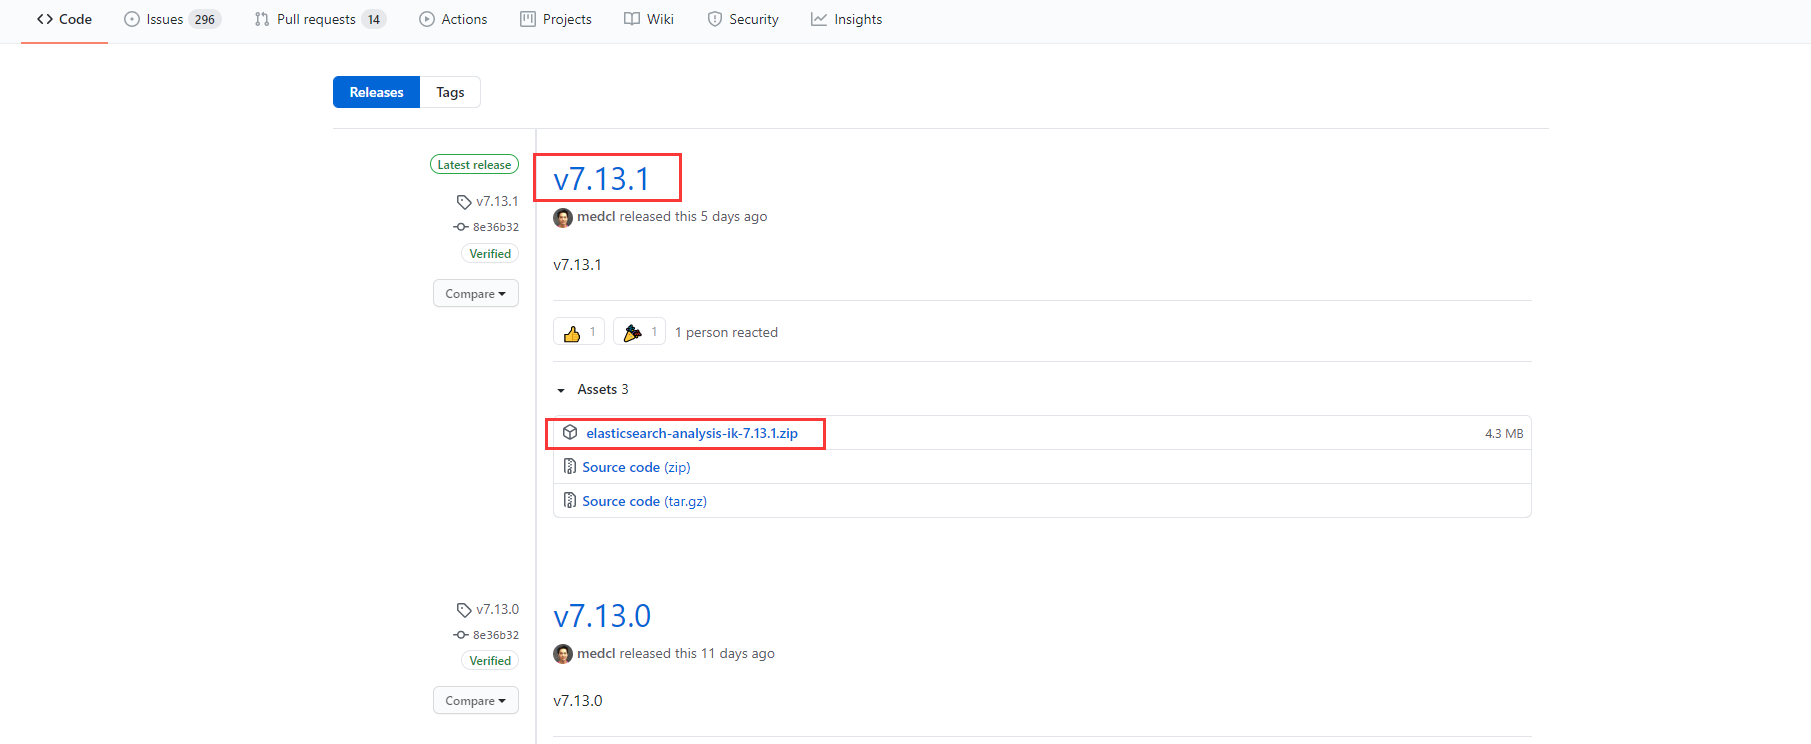
Elasticsearch-analysis-ik的安装 2021-06-17 10:17:05 - 2025-08-18 00:12:03 無慕 - 293 - 24秒 - 2.36K 首先说明下我安装时的环境是windows10。安装步骤下载Elasticsearch-analysis-ik前提:重要提醒:Elasticsearch-analysis-ik的版本必须与Elasticsearch版本一致!!!官方下载地址:https://github.com/medcl/elasticsearch-analysis-ik/releases/下载完成后在Elasticsearch安装目录的plugins文件夹下新建ik文件夹,并将下载的文件解压到此文件夹:然后重启Elasticsearch,可以使用Elasticsearch-Head中的复合查询测试下效果。end 编程 - 后端 Elasticsearch